This has been a very productive week! I have finished two projects, a top and a skirt. It was a toss up which one would go first but since I did the last post on the top, let's continue! I will start by saying I LOVE THIS TOP! It is comfortable and if positive comments were worth money, well, I'd be buying you all lunch!
Pattern:
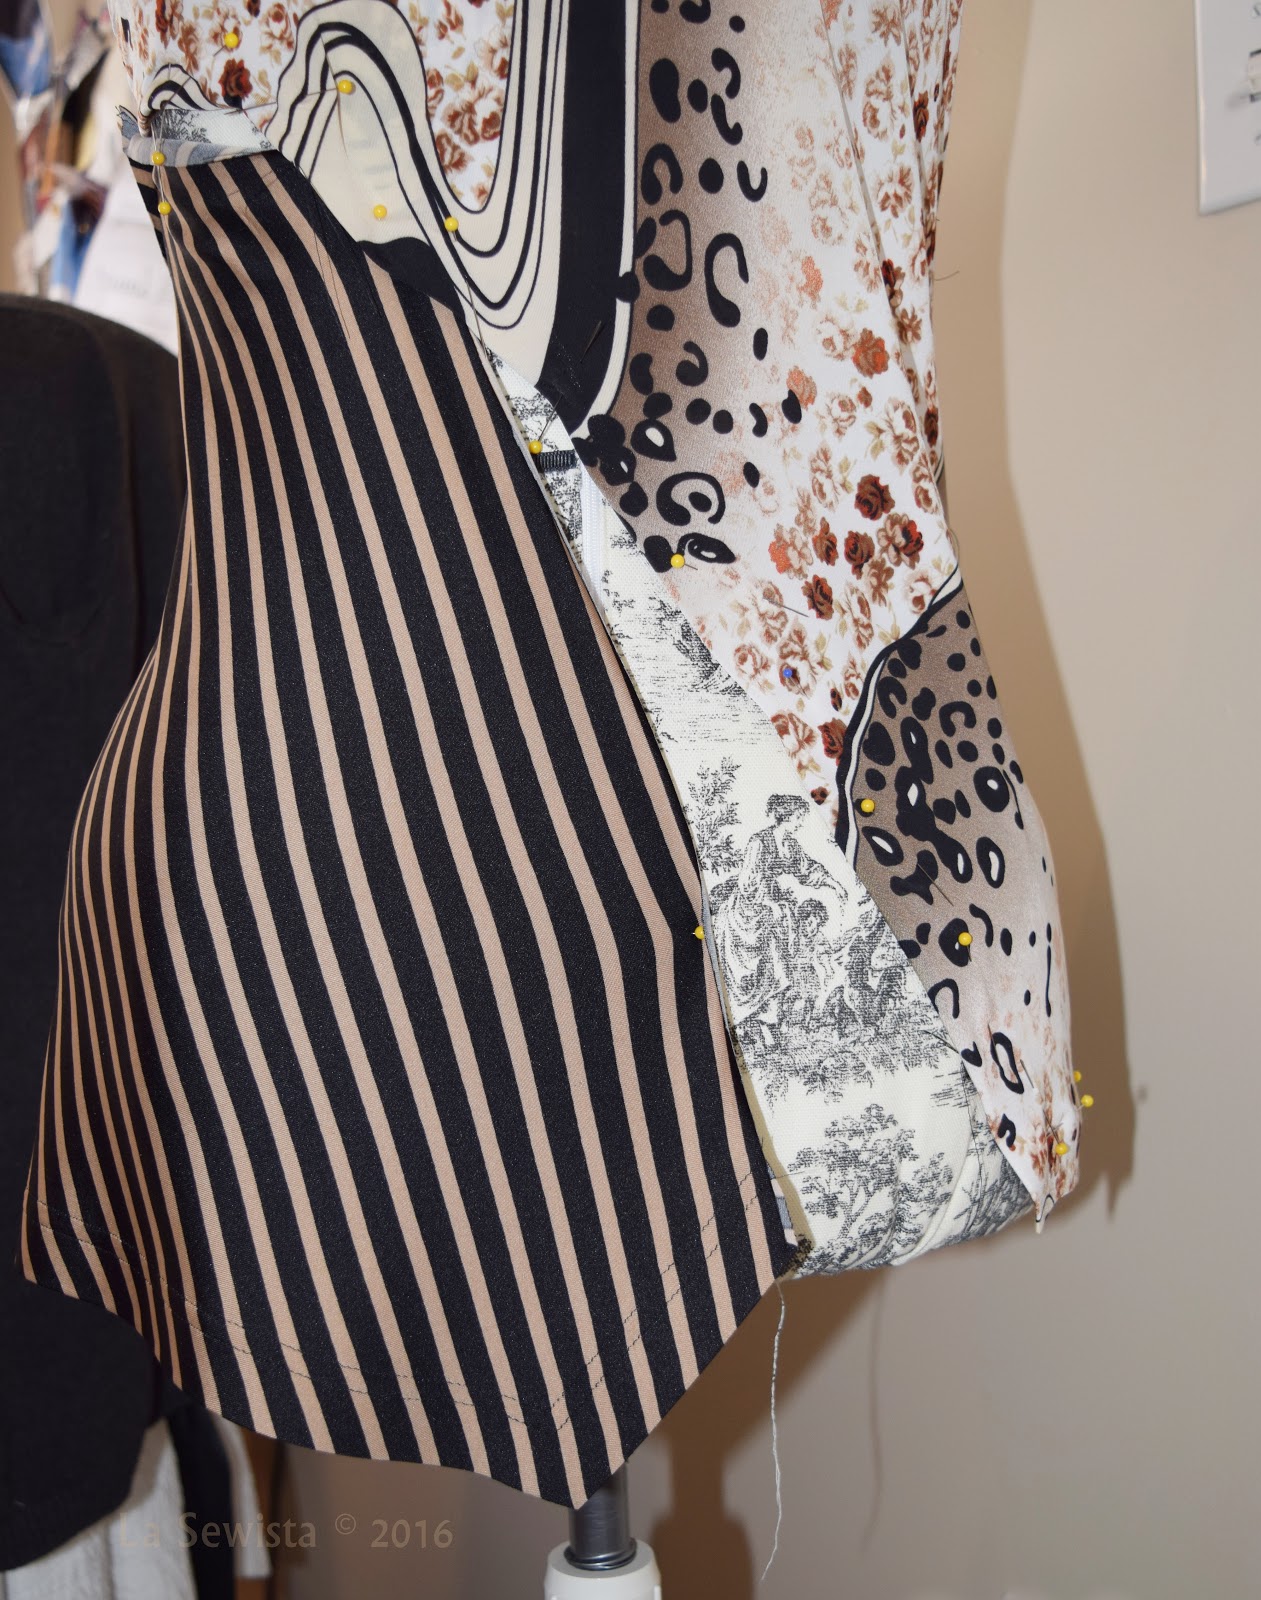
This is
Vogue 9169, "Pullover top, has neckband, seam detail variations, and stitched hem" per the pattern description. I did View B with what it calls an "applied upper section".
This is a tricky pattern to alter, obviously. I cut a size six morphing to ten at the hips. This was directly as a result of flat pattern measuring. That was tricky too but I thought I nailed it. I didn't. I also did a minor "cheater" FBA, curving out the side seam at bust level. I still could use a tad more fabric on the bust and will do a more traditional FBA next go-round. I DID NOT petite this pattern as it seemed to be just right when which you can see by no horizontal wrinkles between neck and bust. Also, the apexes matched. The big fit issue were the hips. Yes, they would meet but I am not a fan of negative ease, just not me. So I added the godet as I showed you in the previous post. Frankly, I am starting to think of myself as the Godet Queen. Heaven only knows how many times you have seen me solve a fitting challenge with a godet. We've done hips, backs, sleeves, underarm to hem, you name it. Doesn't fit? Stick a godet in it! But don't call it a wadder and give up. Worse case, you donate it, but you will have also gained lots of sewing knowledge and experience in the interim. Out of the pulpit!
I also added one inch to the bicep area of the sleeves. I do this now automatically to all my patterns. I know most probably wouldn't alter the sleeves on a knit top, but again, I am not a fan of negative ease. Maybe I've just lurked too much on People of Walmart. The sleeves have been shortened to my preferred 7/8ths length.
Fabric:
The print is an ITY knit from Fabric.com. It is thin but not too thin. The stripe fabric is from a maxi skirt purchased at our local thrift shop, St. Vincent de Paul's. I have several knit garments I've purchased recently just to have the fabric. There is a lot of fabric in those maxi skirts!
I backed the hems with Dritz quilt batting tape, a soft but stable tricot fusible tape. For the neckline I used regular fusible tricot interfacing, however. This is because the neck hole really is not that big on this pattern. It goes over my head, certainly not the biggest, just barely. And the ITY is definitely VERY stretchy in all directions. That neckhole really needs to be a bit bigger, or something, so fair warning there.
Construction:
This was pretty straightforward for a knit top. Since I didn't have to do any petite adjustments or narrowing of the shoulders, I would recommend double checking your measurements in the upper bodice area. I am very narrow there and it fit just right in the size six, which usually requires some alteration for me.
All seams were stitched with a wobble stitch, a very narrow zigzag of 1.0 length and .5 width. I did another row of stitching one eighth inch away and then trimmed back to the second stitching.
I was not happy with the neck binding. I matched notches and seams and the seam that closes the binding ended up in an odd spot. Watch out for that. I also have a question for all you knit experts out there as I certainly don't fit into that group. When you use a pattern piece for a neck binding on a knit pattern, do you cut it smaller? Or does the pattern take that into consideration. The binding was smaller but I felt it could be even more so to lie just a little flatter. I'd appreciate any input. So do you automatically cut back your binding a certain amount, even if it is from a pattern? Thanks for your answers.
I found matching the stripe section to the print section a bit confusing. There is supposed to be a line to match the two on the pattern but all my pieces had was a line for folding up the hem on the top bodice. So what I did was match the raw edge of the stripe with the raw edge of the folded under hem of the print. This put the stripe an inch and a quarter underneath the print. Then I topstitched. I found the topstitching directions/drawings a bit confusing, too. There is no topstitching line on the top bodice so you are on your own to figure out the best place to topstitch and how many rows. It would be hard to make that look really bad but it would be nice to know what the original designer intended. In the pattern, the sleeves are installed in the round. If I did it again They would be done flat. I also think I would leave a shoulder seam open to insert the binding that way.
In Conclusion:
All in all, I am very happy with my top. It fits quite nicely even if not perfect and I can see myself making this again, It could be fun in a solid with maybe just a binding on the hem edge. There is a lot of opportunity for creativity here.
******************************
I have been in a skirt sort of mood lately and am anxiously awaiting some linen purchased on line. In the meantime, I took some denim I've had for some time and just went with it. I tried a style of skirt that I really wasn't sure would work. I think it did and will have that coming up next. It has been a fruitful week!
And yes, I am letting my hair go gray, quelle horeur! Truth is I am painfully jealous of my sister's glorious white hair that she has had since she's thirty. If mine can be half as gorgeous........in the meantime it's calico head with the silver up front, the natural dark at the back and sides and the faded brown growing out poorly on top. I will be happy when it is all grown out. But will it be like Sis's with it's thick white coloring? Only time will tell.....Bunny